Stacy Talks & Reviews: scrapbooking

Search My Blog

Showing posts with label scrapbooking. Show all posts

Thursday

Fujitsu ScanSnap iX100 for dads & grads


Have you ever had one of those moments you wished there was a way to save a copy of an important document? Or maybe scan something like a photo or your child's artwork to send to a relative? Well wish no more that's exactly what you can do with the Fujitsu ScanSnap iX100. It's battery operated so it's super portable, plus it's very compact at just under 11" wide. Plus it's wireless so you don't even have to worry about plugging it into a computer for it to work. Just connect via a Wi-Fi connection to your computer or your cell phone and you're ready to scan and save your document.

Scan to:
• PDF
• Searchable PDF*
• JPEG
• Word (editable)*
• Excel (editable)*
• Business Cards*
• Mobile

Now that's a whole lot of options! Just imagine the possibilities. You could scan artwork drawn by your kids and save it forever in digital format! I'm thinking it would make an excellent graduation gift, or even for dad on Father's Day. Just think of all those things they could be saving digitally and saving room in their desk drawers!


About:
The ScanSnap iX100 is the world's fastest battery powered ScanSnap. Whether scanning receipts, contracts, recipes, or plastic cards, the iX100 takes scanning beyond the desktop and into your mobile world. Completely wireless and weighing only 14.1 ounces, the iX100 brings mobility and wireless scanning to your PC or Mac as well as iOS or Android device. With it, you can scan bills, business cards, mail, kids' artwork, old pictures,  - you name it - to the cloud to become the most organized, paperless version of yourself. Comes with automatic sorting associates scans by type of document and saves specific categories to different cloud services (Evernote, Google Drive, Google Photos, Box, etc.)

Disclosure: This is a sponsored post on behalf of the above mentioned brand. I may have received monetary compensation and/or product in exchange for my honest and unbiased thoughts. However, all thoughts and opinions stated are my own and are in no way influenced by my partnership with mentioned brands.

Tuesday

Epson LabelWorks Printable Ribbon Kit


If you're like me (and many other moms out there I know) you still haven't finished wrapping Christmas presents yet. Heck, I'll be totally honest and admit I haven't even started yet this year. Usually by now under my tree is at least half full and as of right now the only presents under it are the ones my daughter got from shopping day at her school. I've just been overly busy this year so I've been putting it off. I guess I'm partly glad I did though because that gave my new Epson LabelWorks Printable Ribbon Kit time to arrive. And now I can use it to make custom ribbons for some of the presents. I thought it would be neat if I made ribbons with the kids names on them as well as their favorite sayings. Something they could use later to tie around a stuffed animal or object in their bedroom for decoration.


Take Ordinary to Extraordinary™
Print personalized satin ribbons for crafts, scrapbooks, decorations, gifts and more — all with the fun and easy-to-use LabelWorks Printable Ribbon Kit from Epson. Delight your kids with birthday party favors that have their very own name on them. Give the bride and groom something extra special for their wedding with customized bookmarks, wine glass name markers and creative centerpieces. Gifts for any occasion are cherished even more when wrapped with personalized ribbon. You can even get creative and brighten up your own homemade crafts. Customize your ribbons using a wide variety of fonts, symbols and frames. Then instantly print and cut them at just the right size using Epson's LW-300 printer. You get beautiful ribbons that will charm friends and family alike. And up to 30 of your favorite ribbon designs can be stored and used again.

Connect with Epson:
Website | Facebook | Twitter | Google+

Wednesday

Start the New Year off celebrating memories (and making new ones)!


Over the last year my 8-year old daughter has taken an interest in scrapbooking. I think partly she just wants to do what mommy does, but also she likes to be creative. And if you've ever done any scrapbooking you know it can get as creative as you want it to. For some I think that may be intimidating, but let me assure you that even the most basic of crafters can scrapbook. Really all you need are a few simple items like a scrapbook, adhesive, and of course photos. My daughter is always asking me to do crafts with her so I thought it would be a lot of fun if we did a scrapbook together with only photos of the two of us. I didn't want to make it too complex so that I knew it would get completed for us to enjoy and not have to still be working on it months from now. With that in mind we went on the Family Christian website and picked out a really awesome scrapbook kit to start with. Then we found some double stick adhesive and a neat 3-in-1 punch for a little added fun. With that and our photos we were ready to get started!


Our first step was to sort our photos and decide which ones were going to be on what page. The album came with ten protective sleeves so we knew we had twenty pages to fill. Knowing this we made our piles in a way we knew we would utilize the most photos, but not over do it. As I'm sure you know you can later add more pages to an album, so we'll be able to add to it as we do more together and have more photos too! But for now we've got our photos sorted and have already finished our first page. We decided to make it a simple page by only adding a few of the card stock stickers that were included in the scrapbook kit. I've always struggled with things being just a certain way when doing crafts so this is a learning experience for me, and it's a great way to bond with my daughter. This time I'm letting her decided what papers and stickers to use and where the photos go, and I am just gluing everything down. It was her idea so in the end she will be able to tell everyone that she created the layout for the book with pride. And as her mom I'll be able to smile knowing it's something that we created together and can enjoy for years to come.

Friday

How to Take Your Art into the Next Dimension with Cricut

This post contains affiliate links and I will be compensated if you make a purchase after clicking on my links.


It started out as a doodle, something small, casually tossed in the margin of your grocery list. But somehow this graphic element took over and before you knew it, it became the decorative element to everything in your world. Unfortunately all those minute details that you added make it virtually impossible to transform it into the third dimension. Not true. If you can print it, you can cut it with the Cricut Explore machine.

Now with the newest feature of the Cricut Explore machine, you can choose your image (either your own or one of 50,000+ in the Cricut Design Lab), flatten the image and then click 'Go'. Once printed, the Cricut Explore machine works its magic to bring your 2-dimensional idea into the 3rd dimension.

Take a look at this super short instructional video (less than 4 minutes) and see just how easy it can be…


Wow now that looks awesome if you ask me!

And don't forget you can get Free Shipping right now too: Free shipping on orders $31+ with code HALLOWEEN31

Tuesday

End of school means time for summer crafting fun!

Now that schools been out for a few weeks and we are finally getting into a routine it's time to start on some fun craft projects with my kids. My daughter and I did one with an awesome watch kit from Oriental Trading the other day and it was a lot of fun.


The kit I got was called a Winter Watch Kit and it came with enough materials to make two watches which was perfect. Each set was in it's own little package with all the necessary pieces (it also included an extra parts bag) as well as an instruction sheet.

The instruction sheet gave you a pattern you could follow, or you could create your own. As you can see my daughter and I each did ours similar, but a little different on the backside where it came together. I thought the larger beads might be too big for my arm. All in all it was a very easy watch to make and now we have a set to wear together. She loved the time we spent together making them and couldn't wait to tell everyone at church Sunday that we had a matching set that we made.

My next project is going to be starting on school scrapbooks for my kids. I am completely in love with the School Year Paper Pack and the School Puffy Stickers that Oriental Trading carries. The papers are perfect for highlighting their school picture for the coordinating year. And because I got two sets I can do the same layout for both kids and get through them extra fast! The bright colors are easy to match with solid papers I already have so it will be very easy to coordinate with them. I can't wait to get them started and share my layouts with you!

Disclosure: I received the above mentioned products in exchange for my honest review. No other compensation was received and all thoughts and opinions are my own.

Wednesday

Oriental Trading for your Scrapbooking & Paper Crafting Supplies!


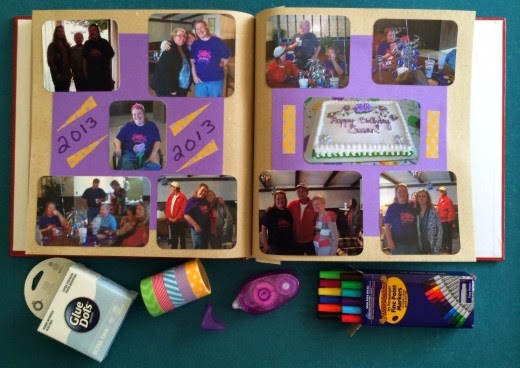
Did you know that Oriental Trading has lots of Scrapbooking and Paper Crafting supplies? I had no idea until I was browsing around recently just how many different products they carried in this category. I had always had the pre-conceived opinion that they just carried supplies for parties and crafts for carnivals and things like that. I had even ordered things from them before for Vacation Bible School and still didn't know about this "hidden treasure" that was just sitting there waiting for me to discover it. And since I didn't know I bet lots of you didn't realize it either and that's why I'm sharing this great resource with you. My  two page layout above was created using all of the items shown under my scrapbook. I got them all from Oriental Trading, and they were all available with a minimum order of one. You don't have to worry about having to order multiple sets like some of their other items, these are all available in as many or few as you'd like.

Have I got your attention now? If not maybe some of these great items will peak your interest:


This is their 1/2 Lb. Pink Scrap Pack that features just what it says 1/2 Lb. of assorted scrap paper. I like this because it has the papers already cut with straight edges. There are so many ways you can use these papers to jazz up a plain page of pictures.

This assortment is their Christmas Scrapbook Paper Pack which you can pretty much tell just by looking at it why it's called that. I really liked this package and what it came with so I've included a few more individual pictures below of some of the papers included.


There's a few sheets of paper with cute words all over it that really you can use for things other than Christmas. I actually plan to use them in my sons baby scrapbook when I get it started. The other paper is a heavier card stock and can be used for lots of things. You can use it as a background just as it is, or you can cut out the individual parts to use on pages, or for other crafts.


The next thing I found really cool in this package was the half sheet card stock sheets above. They will make for some really awesome journaling boxes.

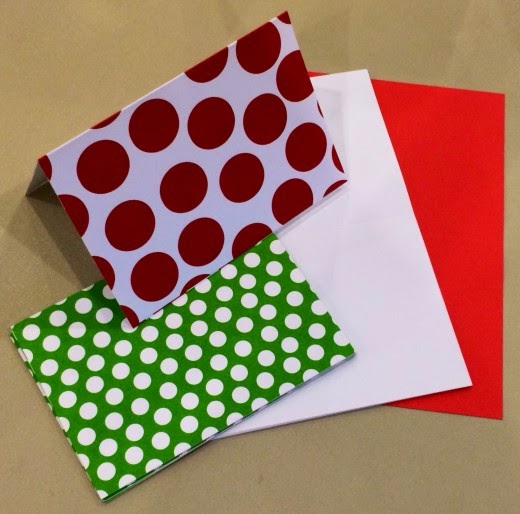
And finally there were several card-style folded sheets. Again I loved this because they are already pre-cut, scored, and folded ready to use. And they aren't exactly in Christmas only patters so I can utilize them year round for making my own cards, or letting my daughter make cards for her friends.


The final package of paper I got was their 3 Lbs. Solid & Pattern Mix Scrap Pack. As you can see it's another very nice assortment of papers in various pre-cut sizes. Several of the colors and patterns actually coordinate quite well with my Christmas pack so this will make for some great layouts. With two kids I'll be needing plenty of paper for their books and will be doing duplicate pages for holidays since I'm doing a book for each of them. Having such a great assortment, and duplicates of many sheets will be perfect!

Make sure you keep an eye out because I have even more great scrapbooking and paper crafting supplies to share with you soon!
Disclosure:  Thanks to PR Firm/sponsor I was provided with the above mentioned product for the purpose of my personal review. This blog post is not a paid post and the honest opinions stated are my own.

Thursday

Scrapbook Weekend Ahead


Do any of you scrapbook? I've been scrapbooking for a few years now and have finally gotten my own space in our home where I can not only store my stuff, but also start on a book and not have to worry about picking it up before walking away for a few hours...days...or even (as I hate to admit) weeks. I'm so excited about my new space and wanted to share it with you, my readers. I hope to in the future be bringing you more of my scrapbooking adventures and have some great product reviews to offer you from different brands that make scrapbook products.

Until I started scrapbooking I never knew there were so many great products out there to use in creating just one book. Glue pens, glue sticks, glue dots, glue tape runners, paper, stickers, embellishments, stamps, paper cutters, and the list goes on and on. Oh and then of course there are all the things you need to store your materials and photos. Photo holders, paper holders, scrapbook bags, photo boxes, wheeled bags, and yes that list goes on and on too. I feel like I'm always finding new things to help me organize my stuff and ways to make my pages stand out. So why not share some of those with my readers! I know I wish someone would have shared some of the things I've learned when I first started.

So for now I leave you with a one tip. If you are new to scrapbooking...or even a seasoned scrapbooker you too may enjoy this tip. Do NOT crop all of your photos as soon as you get them. You may think what a silly tip this is, but I tell you the first night I went to a crop I did just that. I took a big stack of photos and chopped them all to just around the person or object I wanted in the photo. It wasn't until I started laying them out in my book that I realized this was a big mistake. Lesson learned, now I crop as I put them on the page. Sometimes you need that extra part around the picture for a photo to fit behind border paper and look good.
This blog contains affiliate links and sponsored posts. All thoughts and opinions are my own however and are in no way influenced by the sponsorships. As an Amazon Associate I earn from qualifying purchases.